安装前需要进行授权,公用 API 和 私有 API 二选一即可
获取公用 API token
先下载 windows 版本的 rclone 进行授权
https://rclone.org/downloads/
以 Windows 为例子,解压并进入rclone.exe所在文件夹,在资源管理器地址栏输入cmd,回车就会在当前路径打开命令提示符,运行以下命令rclone authorize "onedrive"
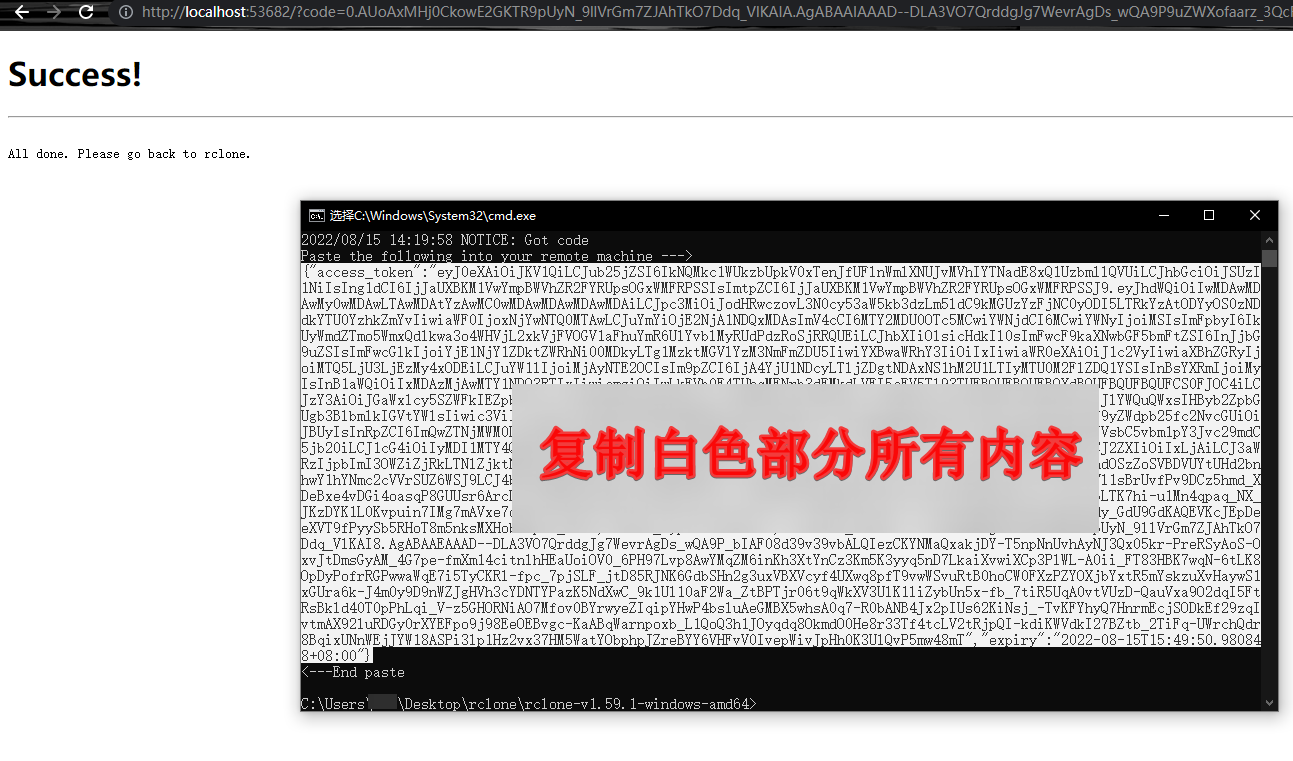
在自动打开的浏览器中登录授权,授权成功后返回 CMD 窗口,会看到以下界面:
复制授权 token 保存备用
Paste the following into your remote machine --->

复制这里面的所有内容

<---End paste
获取私有 API token
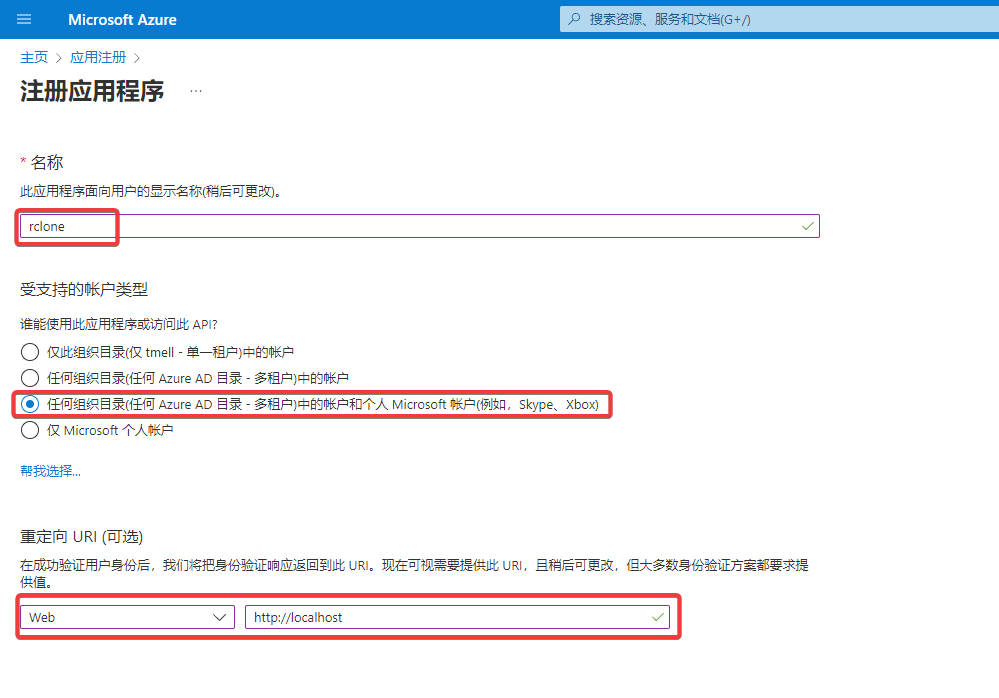
点击新注册,名称随意,账户类型选择第三个,重定向 URL 填写 http://localhost
创建成功后你会看到 Client ID(客户端 ID),复制并保存好
点击证书和密码,添加新的客户端密码,看到 Client secret(客户端密码),复制并保存好
点击API 权限,按照图示进行操作,添加下面这些权限
Files.Read
Files.ReadWrite
Files.Read.All
Files.ReadWrite.All
offline_access
User.Read
获取 token
- 在本地电脑上下载 rclone
- CMD 替换以下命令中的Client\_ID、Client\_secret并执行
rclone authorize "onedrive" "Client_ID" "Client_secret"在自动打开的浏览器中登录授权,授权成功后返回 CMD 窗口,会看到以下界面:
复制授权 token 保存备用
Paste the following into your remote machine --->

复制这里面的所有内容

<---End paste
安装 rclone
curl https://rclone.org/install.sh | sudo bash安装 fuse
挂载需要安装 fuse
yum install -y fuserclone配置
启动配置
rclone config创建新配置
e) Edit existing remote
n) New remote
d) Delete remote
r) Rename remote
c) Copy remote
s) Set configuration password
q) Quit config
e/n/d/r/c/s/q> n # 输入 n 创建一个新的配置
自定义配置名称
name> OneDrive # 这里输入想要的名字选择需挂载网盘类型
Type of storage to configure.
Enter a string value. Press Enter for the default ("").
Choose a number from below, or type in your own value
 1 / 1Fichier
   \ "fichier"
 2 / Alias for an existing remote
   \ "alias"
 3 / Amazon Drive
   \ "amazon cloud drive"
 4 / Amazon S3 Compliant Storage Provider (AWS, Alibaba, Ceph, Digital Ocean, Dreamhost, IBM COS, Minio, etc)
   \ "s3"
 5 / Backblaze B2
   \ "b2"
 6 / Box
   \ "box"
 7 / Cache a remote
   \ "cache"
 8 / Citrix Sharefile
   \ "sharefile"
 9 / Dropbox
   \ "dropbox"
10 / Encrypt/Decrypt a remote
   \ "crypt"
11 / FTP Connection
   \ "ftp"
12 / Google Cloud Storage (this is not Google Drive)
   \ "google cloud storage"
13 / Google Drive
   \ "drive"
14 / Google Photos
   \ "google photos"
15 / Hubic
   \ "hubic"
16 / In memory object storage system.
   \ "memory"
17 / JottaCloud
   \ "jottacloud"
18 / Koofr
   \ "koofr"
19 / Local Disk
   \ "local"
20 / Mail.ru Cloud
   \ "mailru"
21 / Mega
   \ "mega"
22 / Microsoft Azure Blob Storage
   \ "azureblob"
23 / Microsoft OneDrive
   \ "onedrive"
24 / OpenDrive
   \ "opendrive"
25 / Openstack Swift (Rackspace Cloud Files, Memset Memstore, OVH)
   \ "swift"
26 / Pcloud
   \ "pcloud"
27 / Put.io
   \ "putio"
28 / QingCloud Object Storage
   \ "qingstor"
29 / SSH/SFTP Connection
   \ "sftp"
30 / Sugarsync
   \ "sugarsync"
31 / Transparently chunk/split large files
   \ "chunker"
32 / Union merges the contents of several remotes
   \ "union"
33 / Webdav
   \ "webdav"
34 / Yandex Disk
   \ "yandex"
35 / http Connection
   \ "http"
36 / premiumize.me
   \ "premiumizeme"
Storage> 23 #这里OneDrive是23,不同的rclone版本数字可能不同
client\_id 和 client\_scret (使用公用API则直接留空)
Microsoft App Client Id
Leave blank normally.
Enter a string value. Press Enter for the default ("").
client_id> # 输入 Client Id (客户端 ID)
Microsoft App Client Secret
Leave blank normally.
Enter a string value. Press Enter for the default ("").
client_secret> # 输入 Client Secret (客户端密码)
选择 onedrive 地区
Option region.
Choose national cloud region for OneDrive.
Choose a number from below, or type in your own string value.
Press Enter for the default (global).
 1 / Microsoft Cloud Global
   \ (global)
 2 / Microsoft Cloud for US Government
   \ (us)
 3 / Microsoft Cloud Germany
   \ (de)
 4 / Azure and Office 365 operated by 21Vianet in China
   \ (cn)
region> #按自己onedrive地区选
不使用高级配置
Edit advanced config? (y/n)
y) Yes
n) No (default)
y/n> n # 不使用,输入n
不使用远程配置
Remote config
Use auto config?
 * Say Y if not sure
 * Say N if you are working on a remote or headless machine
y) Yes (default)
n) No
y/n> n # 不使用,输入n
输入token (使用公用API则输入公用授权token,使用私有API则输入私有授权token)
For this to work, you will need rclone available on a machine that has a web browser available.
Execute the following on your machine (same rclone version recommended) :
        rclone authorize "onedrive"
Then paste the result below:
result> # 这里粘入前面获取的授权密钥
选择类型
Choose a number from below, or type in an existing value
 1 / OneDrive Personal or Business
   \ "onedrive"
 2 / Root Sharepoint site
   \ "sharepoint"
 3 / Type in driveID
   \ "driveid"
 4 / Type in SiteID
   \ "siteid"
 5 / Search a Sharepoint site
   \ "search"
Your choice> 1 # # 这里问你要选择的类型,因为是使用 OneDrive ,所以输入 1
选择硬盘
Found 1 drives, please select the one you want to use:
1: OneDrive (business) id=xxxxxxxxxxxxxx
Chose drive to use:> 1 # 检测到了网盘,这里编号是 1 ,所以输入 1
网盘的root目录
Found drive 'root' of type 'business', URL: https://p3terx-my.sharepoint.com/personal/xxxxxx/Documents
Is that okay?
y) Yes
n) No
y/n> y # 问你是否确认,如果没问题则输入 y
确认并退出配置
--------------------
[onedrive-chuqidecha]
type = onedrive
token = {"access_token":"xxxxxxxxxxxxxxxx"}
drive_id = xxxxxxxxxxxxx
drive_type = personal
--------------------
y) Yes this is OK (default)
e) Edit this remote
d) Delete this remote
y/e/d> y # 如果配置没问题,继续确认
Current remotes:

Name                 Type
====                 ====
onedrive-yuanzheng  onedrive

e) Edit existing remote
n) New remote
d) Delete remote
r) Rename remote
c) Copy remote
s) Set configuration password
q) Quit config
e/n/d/r/c/s/q> q # 退出配置
挂载
创建挂载目录
mkdir -p /home/od手动挂载
#挂载
rclone mount <网盘名称:网盘路径> <本地路径> [参数] --daemon

#取消挂载
fusermount -qzu <本地路径>
网盘名称为配置时填的 name,网盘路径为网盘里的文件夹,留空为整个网盘,本地路径为 VPS 上的本地文件夹。参数可以查看官方文档根据需求进行选择。实际输入时不要有括号,这里只是为了更清楚的区分。--daemon 为进程守护参数,可后台运行
检查是否挂载成功
df -h设置开机自启挂载
vim /etc/systemd/system/rcmount.service

## 請輸入以下內容 ##
[Unit]
Description=rcmount
After=network.target

[Service]
User=root
Type=forking
ExecStart=/usr/bin/rclone mount OneDrive:lnmp_backup /home/od --daemon --allow-other --allow-non-empty --vfs-cache-mode writes


[Install]
WantedBy=multi-user.target
运行启动项
systemctl daemon-reload
systemctl enable rcmount.service
systemctl start rcmount.service
手动增量备份
#说明
#rclone sync 你的网站目录绝对路径 你的网盘绝对路径

#例子
rclone sync /home/wwwroot/www.xxx.com OneDrive:lnmp_backups/xxx/www.xxx.com
backup.sh脚本
如果你的建站环境是使用LNMP一键安装包的话(不是的话也可以直接复制一份修改),可以到路径 /root/lnmp1.7/tools下找到该脚本(能实现全站&数据库打包成压缩包并备份),复制一份到家目录下:
cp ~/lnmp1.9/tools/backup.sh ~/home/按照脚本头部说明,开始修改备份脚本:
vim /home/backup.sh- Backup_Home="上边新建的服务器备份文件夹的绝对路径"(即已挂载到onedrive网盘的目录,脚本执行时会直接上传到网盘的,所以我就没有启用脚本的FTP备份了)
- Backup_Dir=("网站目录的绝对路径")
- Backup_Database=("数据库名字")
- MYSQL_PassWord='数据库密码'
- -3day意思是备份保留3天,你可以修改成想要的保留天数
#IMPORTANT!!!Please Setting the following Values!

Backup_Home="/home/backups/"
MySQL_Dump="/usr/local/mysql/bin/mysqldump"
######~Set Directory you want to backup~######
Backup_Dir=("/home/wwwroot/vpser.net" "/home/wwwroot/lnmp.org")

######~Set MySQL Database you want to backup~######
Backup_Database=("lnmp" "vpser")

######~Set MySQL UserName and password~######
MYSQL_UserName='root'
MYSQL_PassWord='yourrootpassword'

######~Enable Ftp Backup~######
Enable_FTP=0
# 0: enable; 1: disable
######~Set FTP Information~######
FTP_Host='1.2.3.4'
FTP_Username='vpser.net'
FTP_Password='yourftppassword'
FTP_Dir="backup"

#Values Setting END!
保存后即可执行该备份脚本了
./backup.shcron定时备份
使用cron命令来添加定时任务,实现自动备份
crontab -e写入以下两条定时任务
#每日22:20定时执行rclone sync备份到网盘
0 22 * * * rclone sync /home/wwwroot/www.xxx.com OneDrive:lnmp_backups/xxx/www.xxx.com

#每隔3天(在22:10)执行backup.sh脚本全站(包括数据库)备份到网盘
10 22 */3 * * /home/backup.sh
Comments | NOTHING
该文章已经关闭评论